
How to leverage settings in the Admin Panel to get the most out of Chekhub.
The Admin Panel serves as a valuable toolset for users with administrator roles, enabling them to efficiently oversee all aspects of their organization from a centralized location. Each tab's function is explained in detail below.
Organization
- This section serves as your Organization's profile, providing you with the ability to easily access and update essential organization details such as your address, phone number, business hours, and other information.

- This section can be edited by Admins to update important information or change organization controls such as Complex Password, Require Checkin Location and Password Expirations.
Subscription
- The Subscriptions tab is where you can view your organization's licenses and portal usage, as well as enabled features and the members panel.
- The Members panel is conveniently located within this tab, giving you easy access to manage and view all information related to organization members. This allows administrators to efficiently handle member-related tasks, such as updating profiles, adjusting roles, and monitoring member activity.
- View and Manage Subscription Details:
- Licenses: This section displays the total number of licenses, sites and portals being utilized.
- Enabled Features: In the Licenses section, you can also view the features enabled for use within your organization.

Effectively managing your subscription, including licenses and members ensures your organization remains up-to-date and properly configured.
Roles
- Custom roles in Chekhub allow you to define specific permissions for different users in your organization, ensuring that team members have the appropriate access to the features and functionalities they need.
- This section allows you to manage the roles within your organization. From this page, you can add new roles, update existing ones, and remove roles as needed.
Follow this step-by-step guide to create and customize roles to fit your organization’s needs.
- Add a New Role
- In the Roles Table, click the +ADD button to begin creating a new role. This opens a form where you can define the name and permissions for the new role.

- In the Roles Table, click the +ADD button to begin creating a new role. This opens a form where you can define the name and permissions for the new role.
- Name Your Role
- Enter a descriptive name for the new role. It’s a good idea to choose a name that clearly reflects the responsibilities associated with the role (e.g., “Project Manager” or “Support Technician”).

- Enter a descriptive name for the new role. It’s a good idea to choose a name that clearly reflects the responsibilities associated with the role (e.g., “Project Manager” or “Support Technician”).
- Customize Role Permissions
- After saving, you can expand the role’s permission categories to tailor the role to your specific needs. Permissions are divided into various categories that reflect different areas of the platform, such as:
- Ticket Management: Control whether the user can view, create, update, or close tickets.
- Asset Management: Grant permissions related to viewing, adding, or editing assets.
- Project Access: Define whether the role can view or manage projects within the platform.
- Administration Rights: Control higher-level functions such as managing users, configuring system settings, or accessing financial data.
Expand each category by clicking the drop-down arrow to view the individual permissions available. Check or uncheck the permissions that best align with the responsibilities of this role. - After saving, you can expand the role’s permission categories to tailor the role to your specific needs. Permissions are divided into various categories that reflect different areas of the platform, such as:
- Save Custom Permissions
- Once you’ve adjusted the permissions for the role, click Save again to finalize the role’s configuration. This will ensure that users assigned to this role have access to the appropriate features and restrictions.

- Once you’ve adjusted the permissions for the role, click Save again to finalize the role’s configuration. This will ensure that users assigned to this role have access to the appropriate features and restrictions.
Creating and customizing roles in Chekhub that match the needs of your team ensures that every user has the right level of access to perform their job efficiently while maintaining security and control over your organization's operations.
Tickets
- In this tab, you can edit ticket priorities to indicate the importance and urgency of a job, ensuring that technicians understand the heightened need for each task based on your organization's specific scale.
- Set a time allotment for each priority to indicate how long each one should take and configure set risk levels on tickets to notify technicians of the potential risks linked to a job.
- Edit Ticket Priorities:
- In the Ticket Priority section, click the "Edit" button located in the top right corner. A window will open displaying all fields related to Ticket Priorities.
- Edi Name, Icon Color, associated time frames, and descriptions related to the priority.
- Save Your Changes:
- Once you have made the desired edits, click the "Save" button in the bottom right corner. The updates will be automatically applied across your organization.

- Once you have made the desired edits, click the "Save" button in the bottom right corner. The updates will be automatically applied across your organization.
- Reset Triggers move tickets between the Open status and Pending or Assigned status via the Four Pillars of Operation: Due Datetime, Elements, Checklists and Participants. Subsequent changes to ticket attachments after a ticket is created can be configured to trigger a status reset.
- Ticket Resolutions are rules that can be added to Tickets in order to move them from the Completed to Closed status on the Dashboard. For instance, you could label a resolution as "Paid," allowing you to identify and close billable tickets once they have been completed and payment has been received.
- Add a New Resolution:
- From the tickets tab, locate the Resolutions panel, click the "+ADD" button in the top right corner. Then, enter the Resolution Name and Description in the prompted fields.
- Save the Resolution:
- Click the "Confirm" buttonto save the new resolution.
- Set as Mandatory (Optional):
- To make the resolution mandatory for closing a ticket, select the "Require to Close Tickets" checkbox.

- When this option is enabled, a resolution must be completed in order for a ticket to be moved from Completed to Closed status.

- To make the resolution mandatory for closing a ticket, select the "Require to Close Tickets" checkbox.
- Ticket Types are a key method for categorizing your tickets, offering a high-level overview of work classification. Each ticket type represents a distinct category that helps streamline organization and management. Once a ticket is assigned a specific type at creation, it cannot be changed. Protected ticket types are for tickets you wish for to have explicit access to, once this is enabled, it cannot be changed.
- A ticket template can be added to assist in quickly creating tickets with similar properties. Templates can include pre-filled fields such as ticket Tags, Locations and Assets, Checklists, Teams and Team Members, along with several other properties. Administrators can customize templates to match common ticket scenarios, making it easier to accurately create and assign tickets. If you would like to learn more about Templates, click here.
Projects
- This tab enables you to create project templates which aids in maintaining consistency and standardization across all new Projects. By using these templates, you can define specific guidelines, structures, and attributes that should be applied whenever a new Project is developed. You can add Template Names, Descriptions, and Tags, as well as upload attachments from your device or the Chekhub Library. If you would like to learn more about Project Templates, click here.
Locations
- Location types can be organized to give a top-down view and better control of the types of locations you will be dealing with. The default settings show from the Region at the top, down to an individual Room at the bottom. If you would like to learn more about Location types, click here.
- A Location Template can be added for use in creating locations, much like a Project Template, you can add names, Tags and Qualifications to each template. If you would like to learn more about Location Templates, click here.
Assets
- Under this tab, you can create, edit and organize your PM rules through custom templates. These can be applied when you create your Preventative Maintenance tickets in the dashboard, allowing PMs with similar settings to be generated more quickly.
- Add a New PM Rule:
- Once in the Assets tab of the Admin panel, locate the PM Rules section, and click the "+ADD" button.
- Fill Out the PM Rule Form:
- The only information needed to create a PM rule is a Name. You may choose to include additional details such as Phase, Watchers, Tags, or a Checklist.
- Additional properties or attributes may be added as well as the attachment of any necessary files.
- Set the recurrence time period and the performance window time.

- Like other Chekhub Templates, Asset Templates enable you to personalize the way new assets are included in your system for work. This simplifies the process and makes it more efficient for your organization.
Teams
- By utilizing team templates, administrators can streamline the process of creating new teams within the organization. These templates serve as a convenient tool for categorizing users based on the specific type of work they are assigned to do. By setting up predefined team structures, administrators can easily assign roles, permissions, and responsibilities to team members, ensuring efficient collaboration and task delegation.
Members
A member template can be added for use when adding new members to your organization. If you would like to learn more about Templates.The Members Control Panel in Chekhub allows administrators to efficiently manage user access and details.
- Access the Members Control Panel:
- Navigate to the Admin page, click on the Subscriptions tab, then navigate to the members panel.
- Search and Filter Users:
- Use the search bar to filter users by Name, Email, Role, Location, and Project.
- Editing Member Actions:
- Click the "Update Access" button to change a members Role, Locations, and Projects. If necessary, resend email invitations to users from this page.
- Directly edit member information, such as Name, Teams, and Qualifications, either from this page or via the Members page.

- To remove the user from your organization, access the Edit User menu.

- Click on the "Delete Member" button located in the top right corner.
By utilizing the Members Control Panel, administrators can easily manage user roles, access, and details, ensuring effective team collaboration and resource allocation.
Billing
- The Billing tab allows you to manage Rate Cards, Tax Codes and Expense Categories.
-
Rate cards in Chekhub help standardize pricing for services, labor, and materials. Follow these steps to configure rate cards in the Admin Panel:
-
Create a New Rate Card
-
Click +ADD to create a new rate card.
-
Enter a name for the rate card (e.g., location, state, or code). Optionally, add a description to specify the purpose of the rate card.
-
- Configure Rates:
-
Use the tabs below the rate card to specify details, including:
-
Cost Amount: Enter the pricing.
-
Tax Code: Define applicable tax codes.
-
Billable Rate: Set the hourly or unit rate.
-
Billing Minimum: Define the minimum charge.
-
Unit Type: Choose the unit by which technicians will be billed (e.g., hours, tasks).
-
-
Complete the information for rate categories as needed, such as Normal, Overtime, Weekend, Holiday, Fixed Fee, Minimum Charge, First Period and Travel.

-
You can also configure additional and alternative rates
-
-
Save and Activate:
-
Once all details are filled out, click Save.
-
To make the rate card active and applicable to tickets, toggle the Activate switch in the Rate Cards panel.
-
- Tax codes in Chekhub's billing tab are used to correctly calculate and apply taxes to invoices. They specify the tax rate and type applicable to specific goods or services. This ensures compliance with various tax regulations.
- Tax Code Creation:
- From the billing tab, locate the Tax Code panel and click +ADD to begin creating a new tax code for your organization.
- Fill Out Tax Code Details:
- Give the tax code a descriptive name (e.g., "Sales Tax - CA," "VAT - 20%"). Make it easy to identify the tax it represents.
- Optionally, provide a brief explanation of the tax code's purpose. This can help clarify its use later.

- Save the Tax Code:
- Once you've filled in all of the necessary details for your tax code, click create. This tax code is now available for use when configuring Rate Cards in Chekhub.
-
Expense Categories, configured in the Billing tab within Chekhub, play a crucial role in organizing and tracking expenses associated with tickets. These categories are applied to tickets based on the expenses incurred and recorded by technicians during their work.
- Creating Expense Categories
-
To create a new Expense Category for your organization, go to the Billing tab, locate the Expense Category panel, and click +ADD to get started.
- Give your Expense Category and select create to add it to the billing tab. Now the new Expense Category can be added to tickets for accurate and efficient billing.

-
Tags
- Chekhub's tagging system empowers you to streamline organization and searchability across your projects, assets, locations, and even team members.
- Adding tags can improve the searchability and organization of the platform. Tags are keywords or labels that can be assigned to various elements within the system, such as Tickets, Rounds PMS, Checklists, and Locations. To leverage tags effectively:
- Create a New Tag:
- Click the "+ ADD" button to initiate the creation of a new tag.
- Name Your Tag:
- An input field will appear. Enter a clear and descriptive name for your tag (e.g., "Priority", "High-Risk Equipment"). Hit Enter or click away from the box to save your newly created tag.
- Tagging Throughout Chekhub:
- Now you can leverage your newly created tag throughout the Chekhub platform. When adding or editing projects, assets, locations, or member profiles, you'll find a dedicated tag section. Simply select the relevant tags to categorize your data effectively.
Qualifications
- In Chekhub, a Qualification refers to a set of predefined criteria or certifications that users must meet to perform specific tasks or roles within the organization. Qualifications ensure that individuals have the necessary skills, knowledge, and credentials to carry out their duties effectively and safely.
- Add a New Qualification:
- Click the "+ADD" button in the Qualifications panel and then give it a name.

- Click the "+ADD" button in the Qualifications panel and then give it a name.
- Assign the Qualification:
- Once named, you can assign the qualification to Checklists, Members, and Assets.
- These qualifications can be used to restrict certain tasks to individuals with the specific qualification.
By creating and assigning qualifications, you ensure that only qualified personnel can perform designated tasks, enhancing operational efficiency and compliance.
Safety Concerns
- Safety concerns allow you to classify the level of risk associated with a job. On this page, you can add level names, descriptions, and color codes to suit your organization's needs. This configuration helps ensure that technicians are aware of the potential risks and can take appropriate precautions.
- By linking these concerns to a Checklist, you can ensure that individuals completing tasks are aware of and understand the associated risks.
- Customize Safety Levels:
- There are five individual levels you can customize by clicking Edit on the Safety Concerns panel.

- For each level, you can edit the Name, Display Color, and Description to fit your organization‚ specific needs.
- There are five individual levels you can customize by clicking Edit on the Safety Concerns panel.
- Save Your Changes:
- After making your edits, click the "Save" button to update your Safety Concerns.
Approvals
- The approvals tab allows you to implement Approval Chains that can be added on to Tickets and PMs. Approval Chains are a powerful feature that enables you to establish a structured workflow for obtaining approvals on specific tasks from Users within your organization.
- Defining the Approval Chain:
- Locate the Chains panel and click the "+ADD" button. In the dialogue box, enter the Name of the chain, along with an optional Description and Location.
- Add Stages:
- To specify approvers, click the orange "add a new stage" text.

- For each stage, provide specific instructions and add multiple approvers if needed.
- To specify approvers, click the orange "add a new stage" text.
- Complete the Approval Chain:
- To add more steps to an existing stage, use the "+Chain" button or to add a new stage, click the "+Stage" button.
- Once you have defined all parts of the approval chain, click the checkmark to save.

Deleted Items
-
The Deleted Items tab in the Admin Panel allows administrators to view and manage deleted items within the platform, providing an organized overview for easy access.
-
From this tab, administrators can recover deleted items ensuring efficient control over data management and system cleanup.
If you are an admin with the necessary permissions, follow these steps to recover deleted items:
- Locate the Deleted Item:
- Once in the Deleted Items tab, use the search bar or scroll through the list to find the item you wish to recover. The list is typically organized by date, so recent deletions will appear at the top.
- Chekhub will provide you details about the deleted item such as when it was deleted and by who.
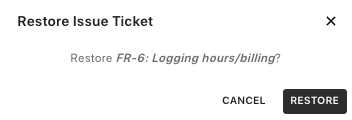
- Recover the Deleted Item
- To recover an item highlight it use the restore icon on the right side of the line item to successfully restore it.
- You will then be prompted to confirm your action. Once confirmed, the item will be restored to its original location within the platform.
- To recover an item highlight it use the restore icon on the right side of the line item to successfully restore it.
- Permission Required: Only users with admin role permissions can access the admin panel and the "Deleted Items" section to perform recoveries. If you are not seeing this option, contact your organization admin to verify your permissions.
By following these steps, you can quickly recover any accidentally deleted items, provided you have the appropriate admin permissions in Chekhub.